This is a site about everyday skills that will help us out if times get hard so why are we making mead? Are we vikings? Nonono. We are making mead because Alcohol would almost certainly have a high barter value to help secure resources for you and yours. I talked a bit about general sanitation in the piece on soap and in a pinch you can distill mead into pure (Kind of) Alcohol for disinfecting. There will be some water in it no matter how many times you distill it but you should be able to get to the 90's. Lastly as alcohol goes this is very entry level. I mean mead could just happen if you were storing your honey outside in the rain in some climates. Some mead is definitely better than others and it will take you some iterations to gitgud, but if you follow these instructions you *will* get mead.
Mix honey and water at a minimum ratio of 3lbs of honey to 1 gallon of water, maximum of 5lbs to 1 gallon. More than 5lbs and it wont process all of the sugars. If you want it sweeter we can add sugar or the like on the back end, you don't want to try and eyeball it and add a bunch of honey upfront unless you know what you are doing. After you have that mixed well you want to add one packet of yeast(I like to use champagne yeast but you could use any kind you want, even bread yeast), usually 5 grams, and mix gently so as not to hurt the yeast. I have used 1 5g pack for up to 5 gallons of mix but I wouldn't spread it much thinner than that. If you want you can activate the yeast first by putting it in warm water for about 10 minutes. A lot of people swear this is necessary but I have never done it so figure out what works for you. Optionally you can add raisins for yeast nutrients as well. Then you want to seal the container with an air lock and leave it in a cool dark place (60 - 70 F) for 2 weeks.
I want to quickly touch on improvised airlocks. If you can just use a real one, awesome, do that. I am however, trying to write these guides with the mindset that the information should be applicable in austere and remote conditions. With that in mind, when it comes to airlocks the idea is to let the mead off gas with out letting contaminants in. The next best thing to a real airlock is a balloon with a few pin holes in it. You want some gas to be able to escape but it must maintain that positive pressure to help keep out contaminants. That being said of all you have is a plastic bag and a string to tie it to the container, that is better than leaving it open.
So at this point, technically, you have mead. If the goal was to ward off the DT's go ahead and indulge. Otherwise we want to move it to a different container, taking care to transfer as little sediment as possible. I like to filter mine through cheese cloth but you don't have to. If you have a home brew store you can add sodium or potassium metabisulfate to help stop the yeast. This part is the secondary fermentation so it will need to be in a big container with an airlock again. We do the secondary fermentation to help ensure that we are not bottling live yeast. I usually let this go for about a month. After this you just bottle it up. If you have access to a home brew store you can get a clearing agent to make it look really nice in the bottles. Now age it for about 6 months and it will be ready to drink.
Lastly I want to stress again that this is a loose guide that you can follow to make mead with very few resources but if you want there are mountains of ways out there to improve on this if you do have the resources. Maybe you want to add cherries to the primary fermentation to make a melowmel (A melowmel is when other sugars are present in the primary fermentation. To keep it a "true mead" just flavor it after the fact.). You can boil the honey to give it a smokey caramel flavor, this is a called a bochet. The project in the picture below is a maple cinnamon brew. Mead is a great hobby in general with some really awesome folks who love to help and teach.
TL;DR
-
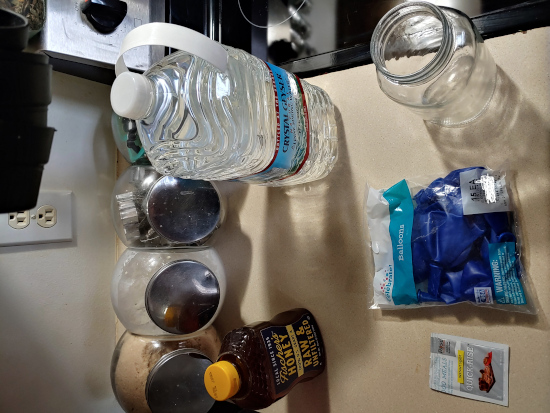
What you'll need:
- -Honey
- -Water
- -Yeast
- -Airlock
- -Suitable Container
- -Thoroughly mix water and honey at a ratio of 3 - 5 lbs of honey to 1 gallon of water
- -Add about 1 gram of yeast per gallon, more will not hurt
- -Secure container with airlock
- -Store in cool dark place for 2 weeks
- -Put in new container for secondary fermentation, getting rid of as much sediment as possible
- -Store in a cool dark place for a month
- -Bottle and age ~6 months at least for best taste
Basic instructions:
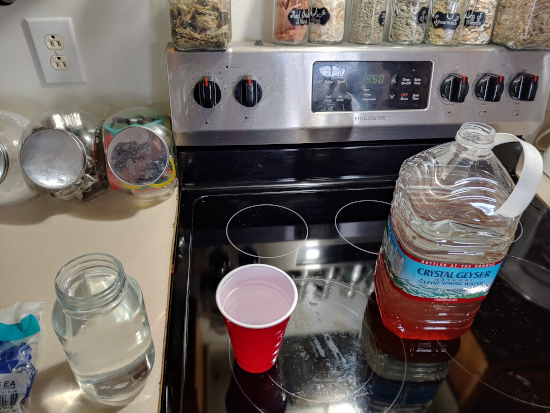
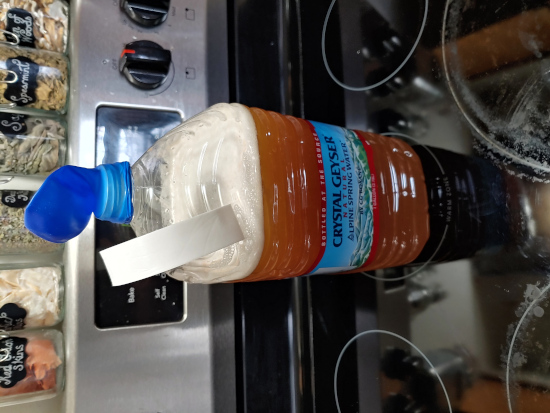
Regarding the pictures, the first one is what you will need. You may find that other things are helpful and that is great but use this as a base line. In the second image I just poured out some of the water into the mason jar to make room for the honey. The last one is what it looks like when it is ready to be put in a cool dark place. I stashed it in the coat closet.